How To Install A Shower Pan
Most wet-area trays are acrylic or fiberglass and How To Install A Shower Pan follows a few fundamental instructions and utilizing the appropriate tools for the task.Wet-area trays are used as the base of a wet-area collect and stall water while you are taking a wet-area.
Assemble the essential tools and devices. Set uping a wet-area tray requires basic home repair work tools and some specialized items offered at the majority of house sellers. To do the job appropriately, you'll need:
Measuring tape
Carpenter's level
Phillips and flathead screwdrivers
Power Drill
Drill Bits
Hammer
Caulking gun
(If required), adjustable pliers
Framing square.
Silicone bath caulk.
New wet-area tray.
1 1/2 or 2-in. screws.
Washers.
Wood shims.
Masking tape.
Measure the area where the brand-new shower pan will be install. Compose these measurements down and take them with you when acquiring the tray.
A lot of contemporary wet-area trays are either acrylic or fiberglass for ease of set upation, however keep in mind that some wet-area trays might need to be special bought if they're not a basic design or size. Find this out before you tear out your existing wet-area.
Standard sizes are 36" x 36"; 36" x 42"; 36" x 48" and are generally available in white or almond. Call Trugard Direct to see if they have your size and color in stock.
Use a vacuum or a broom to clear loose debris. Use a wide-blade putty knife or a paint scraping tool to peel off old caulking and adhesive.
Make any extra surface preparations that are advised by the wet-area tray manufacturer as needed, such as using a fresh coat of a water seal product to the surface area below where the tray will be set uped. Make certain to follow the guidelines on the container for drying time. Do not set up the tray till the water seal is dry.
Dry the surface area totally. Ensure the surface location is entirely and devoid of standing water and extreme wetness prior to setting the tray. A wet surface area can breed mold and mildew. In addition, when sealing with caulk, moisture can affect the Click Here For Shower Pans adherence of the caulk and trigger a defective seal. Click Here For Shower Pans 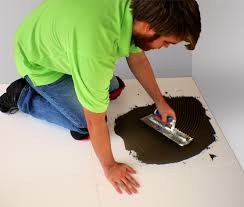 The very first thing you'll require to do after preparing the wet-area base location is "dry-fit" your shower pan within the area. Be sure the tray fits snugly within the area, however not too tight or the tray might buckle. A fit that is too loose will require additional stabilization of the tray.
Inspect to see if the drain cut-out in the tray lines up and fits correctly over the drain pipe. Never require it to line up, as this can cause damage to the tray and to the drain pipe. A little motion (about a half-inch approximately in each direction) of the pipe is fine, and will assist when lining up the drain parts.
Given that drain components vary by manufacturer, follow the illustrations that include your wet-area tray for test fitting. You are ready to complete the irreversible setup once you are satisfied that everything fits correctly.
Setting up the Tray.
Fit the tray in location. Some drain set upations may need a brief coupling piece to be attached to the bottom of the drain attached to the tray, then slipped into the drain pipe in the flooring, sealed with a compression gasket. Others may require a coupling extension pre-inserted into the floor's drain pipe, then the tray slips over the coupler and is sealed with caulking and a rubber compression ring.
With the tray sitting in place, utilize a carpenter's level and wood shims to level the tray, changing with shims as necessary. Do not shim so high that the tray becomes elevated or is "drifting" above the strong base.
Once the tray is level, mark the top of the tray lip where it satisfies the studs, and mark the place of the shims in case the tray has to be moved.
You can briefly secure the tray to the studs by putting a 1 1/2" or 2" screw through a washer, then place the screw simply above the lip of the tray so the washer overlaps the lip to hold it safely. Do not over-tighten, as this may split the wet-area tray.
Utilize your carpenter's level again to make certain your fastening didn't throw the tray off a little. When the tray is level, steady and safely mounted, it's time to make all elements water-tight.
All places where there was any penetration of the tray (i.e. drilled or factory holes) need to be filled with silicone bath caulk to create a water resistant seal. Seal around the studs where the tray makes contact, assisting to secure the tray.
Use a thin coat of caulk, about the thickness of a piece of masking tape, spread over each penetration location. Use just enough to coat and seal where nails or screws are utilized to connect the tray to the studs. Wipe up any accidental drips of caulk from the tray before they dry. If you find them after they dry, you can generally peel them up with your fingernail or a plastic putty knife.
As you're working, do not let any caulk run over the lip of the tray, as doing so can impact the fit and seal of the side wet-area trayels. Clean it off prior to it dries if it runs over while being used.
You'll likewise need to caulk the joint where the tray meets the floor. Make certain the surface area is dry and extremely tidy or you will not acquire a correct seal.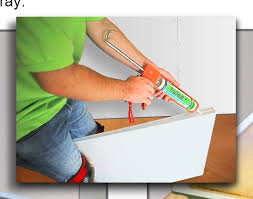 Let the caulk dry and inspect your seals. If suggested by the producer, reconsider all drain components and seal them with caulk. Constantly use a blunt tool the push it into place when you're install any compression seals around the drain elements. Never ever use a screwdriver or other sharp object, which can completely harm the seal.
To ensure your shower is water-tight, whether it's a brand-new install or you're seeking to update your present wet-area, consider a brand-new wet-area pan. This guide reveals you how to set up one, including floor preparation and drain assembly.
- Make sure the flooring is level and clean.
- Test-fit the wet-area tray to validate the drain opening fits over the drain in the flooring.
- Test-fit the drain flange, or external lip, to guarantee it fits flush with the wet-area base.
- If required, add extension to the drain pipe.
- Apply guide and cement to the flange and drain pipe, and connect them to the drain in the flooring.
- Allow cement to dry according to the producer's directions.
- Place gaskets on drain flange so they sit in between the flange and the bottom of the wet-area tray.
- Set the base in location over the drain.
- Caulk the drain flange with silicone.
- Line up holes in the drain body with the screw holes in the flange body.
- Press the drain body firmly into location and connect the drain screen with the screws that featured the assembly.
- Examine the rim of the base to be sure it is level.
- Mark the center of each stud on the rim.
- Pre-drill a hole through the rim at each mark.
- Nail the tray to the wall stud with rustproof galvanized nails and shim as necessary to keep the wet-area base square.
If required, - Check the tray and drain connection for leaks and get an assessment.
- Set up the walls for your wet-area.
Preformed, one-piece wet-area bases make setting up a brand-new wet-area a lot easier. This post discusses the process, from removing the old wet-area or tub to how to set up the wet-area tray and the plumbing.
Let's face it. Wet-areas are the bathing choice of just about everyone. If your restroom has actually ended up being a household bottleneck due to the fact that you don't have adequate wet-area stalls or the one you have is dripping, check out on. We'll show you how to replace a leaking base (aka wet-area tray or wet-area tray), replace a tub with a wet-area only or set up an extra wet-area to deal with demand. Preformed wet-area bases have actually greatly simplified the setup procedure. They're essentially leakproof and are significantly easier to set up than standard strong mortar bases.
Still, setting a base can be difficult, especially when you're renovating older plumbing. In this post, we'll show you how to remove an old tub and replace it with a one-piece fiberglass wet-area base. We'll walk you through the tricky parts, initially how to relocate the drain simply right, then the needed venting. Next, we'll reveal how to set a rock-solid base-- one that will not break or leakage down the road. Our step-by-step guidelines will take you right approximately the point where the walls are all set to finish. We won't go into those surface information here.

This is primarily a pipes job. To take it on, you need to be familiar with fundamental pipeline signing up with methods. Mostly this involves cutting and sealing plastic pipelines and fittings. Do not stress if you make errors. The products are inexpensive and corrections are quickly made by cutting out areas and set uping brand-new fittings and pipelines.
Completing this task-- getting the old tub out, revamping the pipes and set uping the brand-new base-- will take a Saturday at least, a weekend at the majority of. If you have to run a drain line through studs or joists, we recommend that you lease a 1/2-in. Be sure to use for a plumbing authorization and have an inspection done at the rough-in phase (when everything is still exposed) and after everything is total (wall surface areas finished, final hardware set up).
Start by deciding on the size of the wet-area base and ordering it. If you're replacing a tub with a wet-area as we did, there are more details to consider. You'll have the fewest problems if you match the new base to the old tub's width (the front of the tub to the wall).
We changed a 5-ft. tub with a relatively roomy 4-ft. base the very same width as the tub. We framed a 1-ft.- broad filler wall at the end, which is a nice location to develop recessed niches and racks for wet-area products.
Now's a great time to buy a new wet-area valve too, especially if your old one does not have scald security, as all new ones do. It's a huge task to change a valve that fails after tile or wall trayels are set uped.
You'll require a selection of pipelines and fittings for set uping the new drain and for remodeling water lines. Select them up after you open up the flooring and walls. At that point, you can see what you require, prepare the new drain and water supply runs and make a list of materials. Make a sketch like Figure A to help you monitor parts.
Make a sketch of the task that consists of the waste, vent and water supply. Drawing the information will assist prevent prospective problems and also decrease the number of trips to the hardware shop.
- long wet-area base like the one we show in this project. Some come with drain adapters, as ours did. You'll have to check and purchase a separate wet-area drain kit if needed.
Select a wet-area base that has the drain located at one end, right or left, chosen to match your old tub drain. Select one the same length as the tub and you won't even need to add filler walls.
First, loosen the bathtub and the wet-areahead spout. Many styles will loosen, however some will need persuasion with a monkey wrench. If you wish to reuse any parts, cover the tool jaws with a cloth to prevent damage. Then remove the manage and blending valve escutcheon cover. The majority of manages have a little plastic cap that pops off to expose a screw. Remove the screws and manage the handle and the escutcheon.
Next, strip off the tub surround. If you have cement board behind the tile, simply cut through the tape joint at the ceiling and strip the entire wall. If you have a fiberglass surround with a flange behind the drywall, cut 2 in.
With the wall open, disconnect the pipes and shut down the main water system valve. Usually, you can access the trap from an access trayel in the space behind the tub or from an unfinished basement. You'll have to cut a hole in the wall from behind the tub base if you don't have access. Cut off the water lines above them if your shutoff valves are in good shape. If they're missing out on, corroded or stuck, shut down the main supply valve, cut off the water lines and set up 2 compression fitting-- design ball valves and leave them in the closed position so you can turn the water back on to the remainder of the home. Cover completions with tape to keep out debris.
Disconnect the trap from the tub drain, then lift the tub free from the wall. You can pull the tub away from the wall before you tip it up. (Lay an old blanket over the tub to catch flying shards, and wear safety glasses for this!).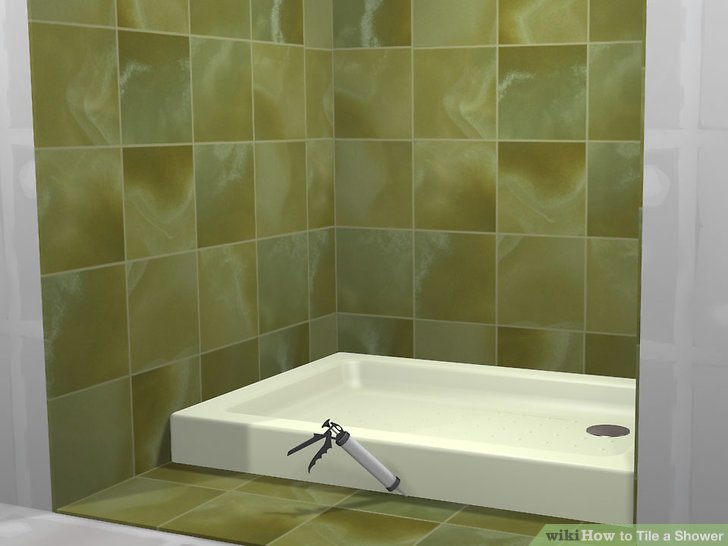 Learn how to develop a custom-sized, waterproof wet-area tray for a curved wet-area enclosure by following these clear, step-by-step instructions and detailed photos.
These days, if you desire to put in a wet-area, you can just go to a home center and select up a fiberglass system. Before that was possible, pros had to develop a customized wet-area tray by mixing and applying mortar, shoveling it flat, and laying ceramic wet-area floor tile.
Although fiberglass systems make wet-area trays easy and quick, they lack the beauty of a handmade mortar and tile floor. So if you wish to set up a tile wet-area and are prepared to construct your own custom-made wet-area tray, you'll have the ability to tile it to match the walls. And with a mortar and tile flooring, your wet-area can be any shape. (For example, see How to Set up a Glass Block Wet-area.) In fact, no matter what its shape, if the wet-area you have in mind does not comply with the stiff size requirements of a made base, a mortar floor may be your only alternative.
How To Install A Shower Pan isn't a project for winging it or taking shortcuts. Poorly set uped wet-area trays will leak, and the only correct way to fix a poor set upation is to rip out not only the base but also the wet-area walls.
Do not let the complex wet-area flooring included in this story scare you (the flooring is created to match the story on How to Set Up a Glass Block Wet-area). The basic techniques are the very same for even the most basic wet-area, so take note-- even if you're setting up a wet-area the size of a phone cubicle.
If we hadn't slowed him down by taking these photos, Trugard Direct who helped could have completed our floor in less than a day with an assistant. If you have experience with cement and some standard trowel skills, you ought to be able to do nearly any size wet-area flooring in less than two days, omitting tile work.