Shower Drain Installation
From $105.86 Regular Price $162.86
To $165.82 Regular Price $255.11
In stock
Shower drain installation isn't typically an uphill struggle, however it always pays to be gotten ready for issues before you begin the job, specifically as every job is different. While it must take simply a couple of hours to replace a drainage in a preformed wet-area base, you'll wish to enable yourself additional time and a versatile toolbox.
Over time, older metal drainages can rust, making them really challenging to eliminate, and you can even encounter issues with installations in more recent wet-areas if access to the drainage is restricted. No matter what obstacles you face, the following suggestions will assist the job go a little more quickly.
There are several choices when choosing a wet-area drainage for your preformed shower base setup. Your choice depends on your wet-area pan and your situation. And the type of pipe you have in your house may assist determine which wet-area drainage material you need to purchase. The manufacturer's recommendations for both the wet-area pan and the drainage may likewise assist you identify which wet-area drainage to purchase.
Wet-area drainages pipes are made to fit 2" drainage pipe. A two-inch pipeline is the advised pipeline size due to the fact that wet-areas have a low threshold for flooding, and 2" pipeline assists the water drainage quicker than does a 1 1/2" pipe. So, if you are transforming from a tub and wet-area mix to a wet-area, you'll likely have to alter drainage pipe size.
Now let's take an appearance at some common wet-area drainages pipes and a quick description of how to place them.
Compression type wet-area drainages attach to the home drainage pipelines with compression washers and nuts. When installation a compression wet-area drainage, the drainage fitting is first installed into the wet-area base.
The drainage pipeline must come up to about 3/4" to 1" below the lip of the wet-area drainage. You may have to put the wet-area base into location to mark the ideal height, then eliminate the pan to cut the pipe.
Put either plumbing's putty or silicone caulk onto the top flange of the wet-area drainage fitting, then place the tailpiece of the drainage fitting into the drainage opening. Put the cardboard friction ring and large rubber washer onto the tailpiece from under the wet-area base.
Tighten up the wet-area drainage until it is tight and great, then remove any excess putty or silicone.
Put the wet-area base into place and press the rubber gasket into the drainage pipe. See All Shower Drains You might require to use a screwdriver to press this into location, as they are designed to fit tightly.
Typically these wet-area drainages pipes included a tool to assist you tighten the nut from within of the drainage. Tighten the nut with this tool.
As soon as the nut is tight, your drainage is prepared for water if you used plumbing technician's putty. You will have to let the silicone dry prior to checking the drainage for leakages if you use silicone.
Glue-on wet-area drainages come in best line drain products for your shower ABS and PVC plastic. If you have a plastic drainage pipe, make sure to match the wet-area drainage to the type of plastic in the drainage system.
When cutting the drainage pipe, do not cut the pipeline too short, to start with. Put the bottom part of the drainage onto the drainage pipeline without gluing, then set the wet-area base into location to check the drainage pipeline height. Make modifications appropriately.
As soon as the drainage pipe height is right, you can either place the drainage onto the wet-area base initially or glue the bottom part onto the pipeline and after that tighten up the leading flange once the base is set into location.
Usage plumbing's putty or silicone on the top flange of the shower drainage. The paper friction washer and the rubber washer go onto the drainage tailpiece from beneath the base.
Keep in mind: Utilize the proper glue when gluing the drainage to the pipe: ABS glue for the black plastic and PVC glue for the white plastic. If you are installing a drainage for a customized tile wet-area base, the drainage fittings are positioned during early steps in building the ceramic tile pan. Tile wet-area drainages been available in ABS, PVC, and cast iron types. Wet-area drainages pipes for wet-areas have a built-in flange that will bolt the waterproof membrane liner to the pan. This liner is the most affordable layer of water resistance and will make certain anything getting in under mortar will still decrease into the drainage and not leakage through the wet-area pan. Wet-area drainages pipes have three pieces: a bottom flange, a middle flange, and the strainer fitting..
After the subfloor of the wet-area is ready and tidy, set up the bottom flange of the wet-area drainage into the drainage pipeline, generally by gluing..
Usage shovelled mortar to create the strong underlayment for the wet-area, sloping it 1/4" per foot from the walls toward the drainage..
The liner is then installed over the flooring and flange of the wet-area pan. Use silicone caulk to seal the liner to the drainage flange. Trim away 4 inch square drains for your shower the liner around the drainage opening.
Place the middle flange of the drainage fitting over the liner and drainage opening, using bolts to secure it to the bottom flange beneath the liner..
Connect the drainage strainer assembly to the drainage, so it stands up from the liner about 1 1/2"..
Now you are all set for the remainder of the ceramic tile setup. Normally this will involve a 2nd layer of mortar, then the ceramic tile applied over the mortar..
Use a special drainage assembly to rapidly and easily set up a new drainage from the top.
Installing a wet-area drainage is not a super challenging job, so long as you do your research study before you attempt to do the installation. Understanding what sort of wet-area pan and drainage you have will help you determine which wet-area drainage to acquire. Something to keep in mind while doing your research study is that a lot of wet-area drainages pipes are developed for a 2" drainage pipeline.
The function for the 2" drainage is to keep the wet-area from flooding, as they have a propensity to do. If you are going from a wet-area/tub mix to strictly a wet-area, you will most likely require to alter the drainage pipeline size from a 1 1/2" pipeline to a 2" pipeline.
Now that you have all the info you need, you can choose which type of wet-area drainage you would like to place:.
Glue on Wet-area Drainage.
This type of drainage comes in both PVC plastic and ABS. If the drainage pipeline you have is plastic make sure to use the exact same sort of plastic wet-area drainage so they match. The glue on wet-area drainage can be utilized with plastic wet-area bases, fiberglass and steel.
When utilizing a gluon fitting it can be more hard to get the measurement of the pipe right, be aware that. So, be sure you measure extremely thoroughly and check all the dry fit pieces prior to you start gluing.
If the drainage you are dealing with is a tile shower base, custom-made than the fittings would have been placed early on in the building and construction for the ceramic tile pan. Tile wet-area drainages have a built in flange. The flange will bolt the membrane liner, which is waterproof to the pan. The task of the liner is to ensure that anything that lips under the mortar still goes down the drainage and does not leakage through to the wet-area pan. These kind of drainages pipes can be found in cast abs, pvc and iron.
Compression Wet-area Drainage.
A compression wet-area drain attaches to drainage pipes with both compression washers and nuts. These wet-area drainages come installing a shower drain how to in brass abs, pipeline or pvc.
As soon as you have actually decided what type of wet-area drainage plumbing task you're going to go with you will wish to get more info that can offer you the detailed. Things to bear in mind when beginning any kind of job:.
- Always have rags and containers prepared to help tidy up any mess that is made.
- Remember to collect all the necessary tools and items for the task prior to starting.
- As soon as you've taken measurements, return and check them.
- Check out through all the actions to be specific you comprehend them.
Depending upon how "useful" you are this type of wet-area drainage plumbing task can get a bit tough, specifically for the tile wet-area drainage. Trugard is well understood for their proficiency and their ability to get the task right the very first time. If you feel that this type of task is a little beyond your reach contact Trugard today.
Make certain to check all local plumbing codes before starting any pipes setting up.
Take apart drainage entirely - unscrew and get rid of outer locknut, friction and sealing washers, eliminate strainer, and internal wrench, unscrew compression nut and eliminate compression gasket from drainage.
Before the wet-area base is embedded in the flooring, apply a bead of silicone around the underside of drainage body flange. Set up the drainage body through the hole in the top-side of the wet-area base. Press and hold drainage body against the wet-area module floor. From the bottom side of the wet-area base, position the black rubber sealing washer, then friction washer, up over the threaded drainage body. Make certain there are no blockages, which the sealing washer makes tidy, even exposure to the bottom of the wet-area module floor. Tighten your drain smells bad up and engage the external locknut up against the 2 washers. Clean away excess silicone that has squeezed out from the top-side of the wet-area base.
Replacing a wet-area drainage isn't generally an uphill struggle, but it always pays to be gotten ready for complications prior to you begin the task, specifically as every task is various. While it must take just a number of hours to change a drainage in a preformed wet-area base, you'll want to allow yourself extra time and a versatile toolbox. Gradually, older metal drainages pipes can wear away, making them really hard to eliminate, and you can even encounter issues with setting ups in more recent wet-areas if access to the drainage is restricted. No matter what difficulties you deal with, the following tips will assist the job go a little bit more easily.
And the type of pipeline you have in your home might assist determine which wet-area drain material you ought to purchase. The producer's suggestions for both the wet-area pan and the drainage might also assist you figure out which wet-area drainage to purchase.
Wet-area drainages pipes are made to fit 2" drainage pipeline. A two-inch pipeline is the advised pipe size since wet-areas have a low threshold for flooding, and 2" pipe assists the water drainage faster than does a 1 1/2" pipeline. So, if you are drains with tiled showers converting from a tub and wet-area mix to a wet-area, you'll likely have to change drainage pipeline size.
Now let's have a look at some typical wet-area drainages pipes and a fast description of how to place them.
Compression type wet-area drainages pipes attach to the home drainage pipelines with compression washers and nuts. When setting up a compression wet-area drainage, the drainage fitting is very first installed into the wet-area base.
The drainage pipeline must come up to about 3/4" to 1" listed below the lip of the wet-area drainage. You might need to put the wet-area base into place to mark the best height, then get rid of the pan to cut the pipe.
Put either plumbing's putty or silicone caulk onto the leading flange of the wet-area drainage fitting, then place the tailpiece of the drainage fitting into the drainage opening. Put the cardboard friction ring and large rubber washer onto the tailpiece from under the wet-area base.
Tighten up the wet-area drainage up until it is tight and great, then eliminate any excess putty or silicone.
Put the wet-area base into place and push the rubber gasket into the drain pipe. You might need to utilize a screwdriver to press this into place, as they are developed to fit tightly.
Generally these wet-area drainages featured a tool to assist you tighten the nut from within of the drainage. Tighten up the nut with this tool.
Once the nut is tight, your drainage is ready for water if you used plumbing technician's putty. You will have to let the silicone dry before testing the drainage for leakages if you utilize silicone.
Glue-on wet-area drainages pipes come in ABS and PVC plastic. If you have a plastic drainage pipe, make certain to match the wet-area drainage to the kind of plastic in the drainage system. Like the compression-type wet-area drainages pipes, this type can be utilized with steel, fiberglass, and plastic wet-area bases. With glue-on fittings, it can be more difficult to get the pipe measurement right, so ensure to determine thoroughly and confirm the dry-fit the pieces before gluing.
When cutting the drainage pipeline, don't cut the pipe too short, to start with. Put the bottom part of the drainage onto the drainage pipeline without gluing, then set the wet-area base into place to examine the drainage pipeline height. Make trench drains for the shower adjustments accordingly.
As soon as the drainage pipeline height is right, you can either set up the drainage onto the wet-area base initially or glue the bottom part onto the pipe and then tighten up the top flange once the base is set into location.
Usage plumbing technician's putty or silicone on the top flange of the wet-area drainage. The paper friction washer and the rubber washer go onto the drainage tailpiece from below the base.
Note: Use the suitable glue when gluing the drainage to the pipeline: ABS glue for the black plastic and PVC glue for the white plastic. If you are installing a drainage for a customized tile wet-area base, the drainage fittings are placed throughout early steps in constructing the ceramic tile pan. Tile wet-area drainages pipes come in ABS, PVC, and cast iron types. Wet-area drainages for wet-areas have an integrated flange that will bolt the water resistant membrane liner to the pan. This liner is the most affordable layer of water resistance and will ensure anything getting in under mortar will still decrease into the drainage and not leakage through the wet-area pan. Wet-area drainages have three pieces: a bottom flange, a middle flange, and the strainer fitting..
After the subfloor of the wet-area is prepared and clean, place the bottom flange of the wet-area drainage into the drainage pipeline, typically by gluing..
Usage shovelled mortar to produce the solid underlayment for the wet-area, sloping it 1/4" per foot from the walls towards the drainage..
The liner is then installed over the flooring and flange of the wet-area pan. Usage silicone caulk to seal the liner to the drainage flange. Cut away the liner around the drainage opening.
Place the middle flange of the drainage fitting over the liner and drainage opening, using bolts to secure it down flange beneath the liner..
Attach the drainage strainer assembly to the drainage, so it stands from the liner about 1 1/2"..
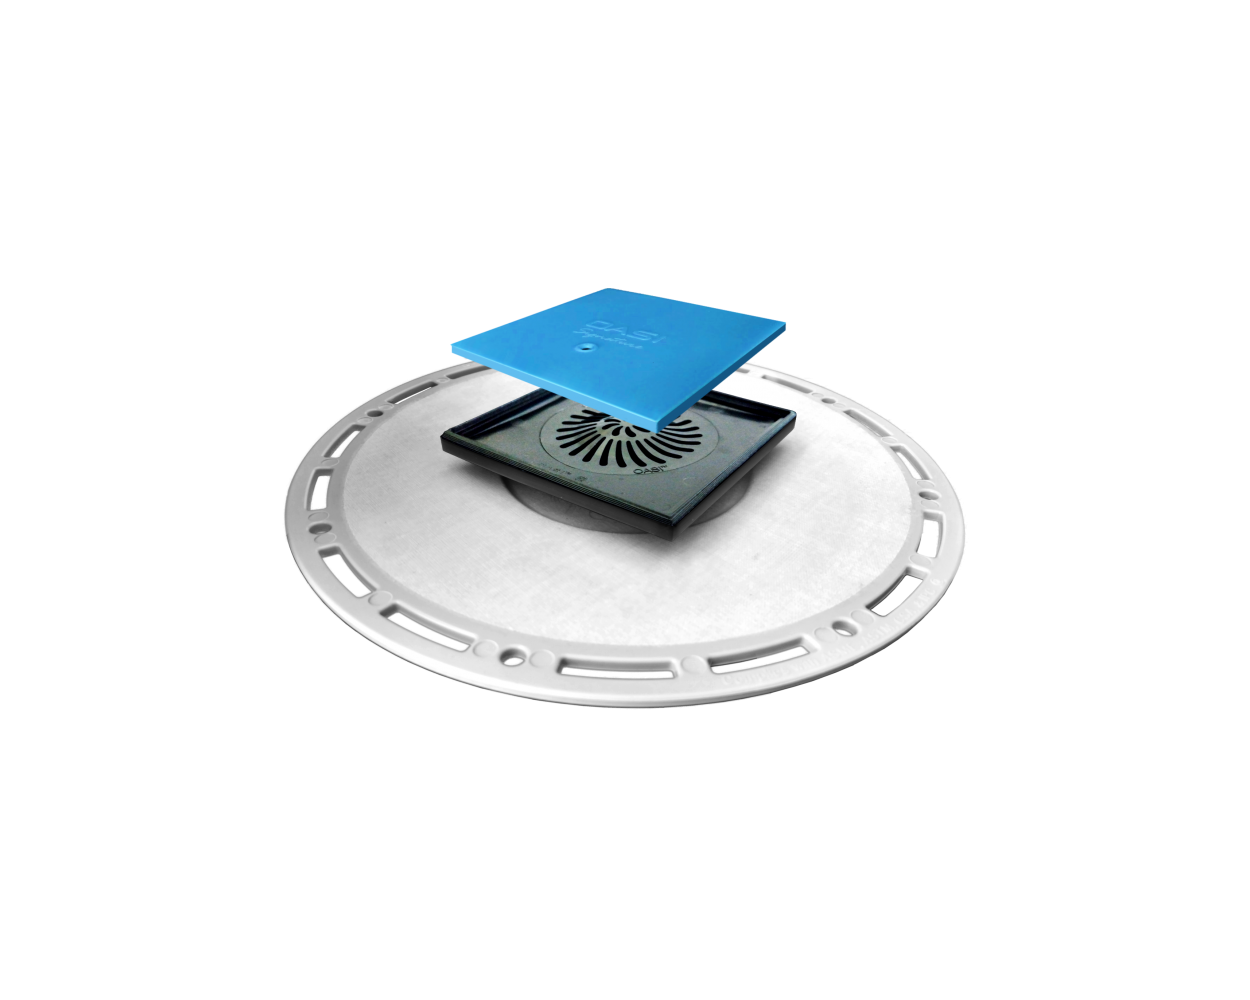
Now you are ready for the remainder of the ceramic tile setting up. Usually this will include a 2nd layer of mortar, then the ceramic tile used over the mortar.. If you have a leaky wet-area drainage and do not wish to cut open a finished ceiling to get at it from listed below, think about utilizing a special drainage such as the Trugard wet-area drainage, which can be installed from above if the drainage is in a plastic or fiberglass wet-area base. This drainage has an O-ring that seals to a normal 2-in. ABS or PVC drainage pipe (adapters are offered for 1-1/2- in. and 2-in. copper pipeline). It turn out under the wet-area base to secure the drainage in place. The task takes about thirty minutes and doesn't require any unique pipes tools.
The hardest part is eliminating the old drainage flange. You'll most likely have to cut it with a hacksaw blade and pry it loose in sections from the wet-area pan. It simply slips over the drainagepipe and seals it.
Needed Tools for this wet-area drainage setup Task.
Have the necessary tools for this DIY wet-area drainage setting up job lined up prior to you begin-- you'll conserve time and frustration.
* 4-in-1 screwdriver.
* Caulk weapon.
Shower drain installation is not an incredibly tough job, so long as you do your research study before you attempt to do the setting up. Understanding what type of wet-area pan and drainage you have will assist you figure out which wet-area drainage to buy. Something to keep in mind while doing your research study is that a lot of wet-area drainages pipes are created for a 2" drainage pipe.
The function for the 2" drainage is to keep the wet-area from flooding, as they tend to do. If you are going from a wet-area/tub combination to strictly a wet-area, you will probably need to alter the drainage pipeline size from a 1 1/2" pipeline to a 2" pipeline.
Now that you have all the info you need, you can decide which sort of wet-area drainage you would like to set up:.
Glue on Wet-area Drainage.
This type of drainage is available in both PVC plastic and ABS. , if the drainage pipeline you have is plastic be sure to utilize the exact same kind of plastic wet-area drainage so they match.. The glue on wet-area drainage can be utilized with plastic wet-area bases, fiberglass and steel.
When utilizing a gluon fitting it can be more difficult to get the measurement of the pipeline appropriate, be aware that. Be sure you measure very thoroughly and double examine all the dry fit pieces prior to you begin gluing.
If the drainage you are working with is a tile wet-area base, tailor-made than the fittings would have been placed early on in the building and construction for the ceramic tile pan. Tile wet-area drainages pipes have actually an integrated in flange. The flange will bolt the membrane liner, which is water resistant to the pan. The job of the liner is to make certain that anything that lips under the mortar still goes down the drainage and does not leakage through to the wet-area pan. These type of drainages pipes been available in cast abs, pvc and iron.
Compression Wet-area Drainage.
A compression wet-area drainage attaches to drainage pipes with both compression washers and nuts. These wet-area drainages come in brass pvc, abs or pipeline.
Be sure to check all regional plumbing codes prior to beginning any plumbing setting up.
Take apart drainage entirely - unscrew and get rid of external locknut, friction and sealing washers, remove strainer, and internal wrench, unscrew compression nut and eliminate compression gasket from drainage.
Prior to the wet-area base is set in the flooring, apply a bead of silicone around the underside of drainage body flange. Hold and press drainage body against the wet-area module flooring. From the bottom side of the wet-area base, place the black rubber sealing washer, then friction washer, up over the threaded drainage body.