Shower Pan Kit
From $115.34 Regular Price $177.45
To $2,086.39 Regular Price $3,209.79
In stock

Trugard TruSlope Shower Pan Kit is made of expanded polystyrene also know as high-density styrofoam. TruSlope shower trays are a viable alternative to the traditional sand mix shower mortar beds because of several significant benefits. We do however still recommend the dry pack sand mix mortar bed whenever desired because of its incredible proven track record when installed correctly. Especially for specific furnishing applications such as mosaics and small format floor tiles.
The popularity of the shower tray has come about primarily due to three significant benefits. One, it’s simplicity to install the floor trays compared to the standard mortar bed. best pans you cant find at home depot Two, it dramatically speeds up the furnishing process because you do no have to wait overnight for the mortar bed to cure, but can immediately start the furnishing of the waterproof membrane. Three, it ensures a perfect sloping shower floor eliminating the error of possible puddling.
Note: Standard Truslope shower trays require the floor tiles to be no smaller than 2” x 2” square. Click Here For Shower Pans For mosaics and smaller format tiles you should contact us to help identify the best method to use on your particular situation.
Trugard TruSlope shower trays are specifically designed to be used in conjunction with the Trugard TruCurb, the standard Trugard Drain, the TruLine linear drain, and the Trugard Vapor-shield or steam-shield waterproofing membrane system.
Furnishing Step by Step
-
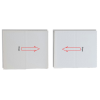
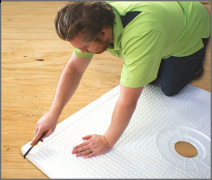
Pre-fit the shower tray by measuring then cutting by equal amounts on all four sides to ensure a consistent height of the first course of wall tile. Now place the tray into the shower area to confirm an accurate fit.
-
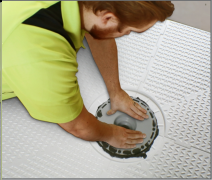
Mark and cut the drain hold for the shower floor drain using the TruSlope tray as a template, while the tray is still in the shower area for pre-fit.
3a. Apply modified thin-set mortar to the substrate using a ¼” x ⅜” square or U-notched trowel.
3b. Place the TruSlope shower tray onto the thin-set mortar.
3c. Solidly embed the tray into the mortar by walking firmly on top the truslope tray.
3d. Lift and check the underside of the tray to ensure complete coverage is achieved, then repeat step 3c.
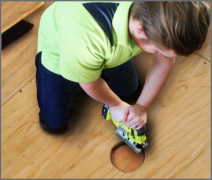
4. Install the Trugard Drain by generously applying modified thin-set mortar in and around the Trugard Drain flange recessed area of the tray. Now align and press the drain downward to connect the waste line with pipe cement glue, and simultaneously embed the drain body down into the thin-set mortar to a height lower than the plane of the tray slope. install pre-sloped pan
NOTE: Modified Rapidset or Speedset thin-set mortar is recommended for the setting of the TruSlope tray and TruCurb system when possible for a quicker cure time. (Not Required) Modified thin-set mortar is recommended for use over gypsum board and cement backerboard substrates. Also, modified thin-set mortar is recommended over the Vapor-shield membrane for tile furnishing. (One popular brand we recommend is VersaBond from Home Depot.)
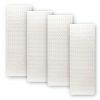
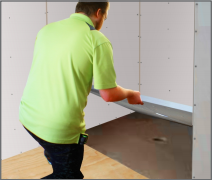
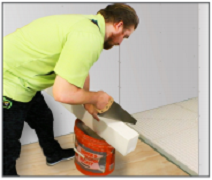
5. Pre-fit the TruCurb by measuring and cutting the curb to length using a standard handsaw.
6. Apply modified thin-set mortar to: 1. The floor & wall ends, 2. The edge of the shower tray using a ¼” x ⅜” square or U-notched trowel. 3. Back butter the curb bottom and ends and then pressing the curb firmly into the floor.
7. Pre-cut at least the floor piece of the Trugard Vapor-shield allowing for the membrane to go up the wall at least 3 inches by cutting the membrane six inches longer than the floor width. Use a non-sharp pencil to mark the wall to floor intersections and corners. Cut the full corner square out of the membrane.
NOTE: Make sure to take into account any type of bench that might be in the plans because you may need to cut the tray or curb to fit. For more on benches, click here. installing pan for shower
Our TruSlope Tray’s are designed to make things simple, however, simplicity isn’t always what everyone wants. In some situations as described above, there are better methods. We have the largest selection of trays compared to any like system company and we pride ourselves in that. We have seen a huge need for more options and we delivered on that aspect. As a company, we are trying to bridge that gap between simple and effective with more options to fit more situations to make the install simple.
This type of high-density styrofoam shower pan kit is not new tech but it gets the job done smooth and fast. One of the top things our contractors point out about our products is how much time and energy these trays save them. Their installers love it because now they don’t have to haul bags of concrete 3 stories up. In a 5 bathroom house, 5 tray’s doesn’t even weight as much as one bag of concrete. They love that part! The second thing that they enjoy about these trays is the ability to simply continue the install. I mentioned this above and I wanted to drill down on it a bit more because it’s very important to contractors and individuals. Most people don’t understand that time in an furnishing project is very valuable. Most DIY’s will try and take their time which delay’s the project longer and longer. I know we have all done that at one point and it’s something we all try to avoid after doing it only once. The speed of the install helps not only with getting things done faster but the amount of work that it takes to get the job done and done right. There is less to worry about because the hard part is done for you with the tray. It’s pre-sloped… build curbless shower with pan That part of a floor tray is super underestimated because it is quite difficult to get the right slope over a large area. Pro’s may argue but they are also pro’s and for this, I’m talking to the DIYs. On that same note, I have witnessed installers who have been doing this for 25 years not get the right slope so this really can benefit all parties.
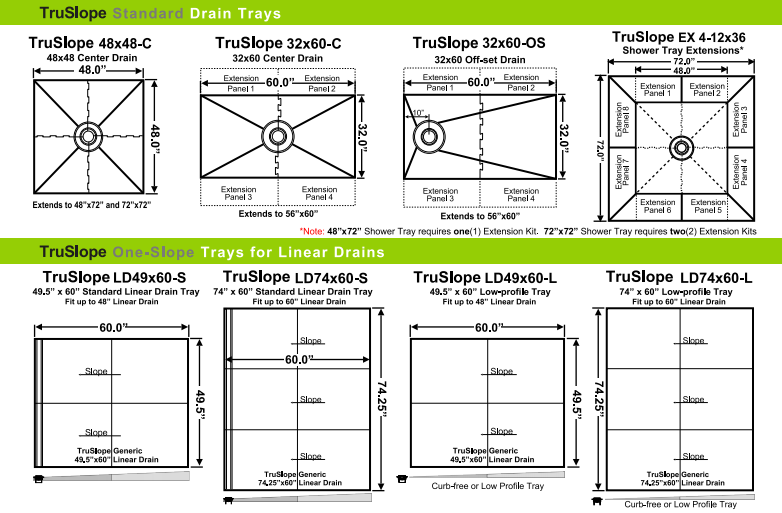
Customizing your tray is easier than you’d expect. You can cut to size any of our trays to get the perfect match for your shower install. Not to mention being able to customize by cutting but you can also customize by adding with the extension pieces that are also available. Having these two capabilities with the tray’s gives you a wide range of style and sizes that you can create for that perfect fit in your shower.
They give a light-weight simple to install alternate to mortar and also other building products. These premade substratums could easily be reduced to size to fit practically any shower application. The shower tray is thin sufficient that you could simply use an utility knife to suffice to dimension. There are unique considerations to remember when cutting the tray. it is essential to understand that because the tray is sloped when you cut it the border will be thinner. preferably, you'll reduce the tray by equivalent or nearly equivalent amounts on all Sides. make your own shower pan by maintaining my height constant it will certainly assist guarantee an also altitude for the very first program of wall surface tile. when the shower location is bigger compared to the tray, the shower base could be extended with completely dry pack mortar.
I have actually been obtaining a great deal of inquiries concerning our shower trays so I intended to go in advance as well as show you a pair of our trays and simply tell you a bit concerning them. firstly, I have actually got a 32" x 60" off facility drain set out here on the flooring as well as I'm in fact going to proceed as well as grab the 32" x 60" Facility so you can see it too. so our trays are very obvious, they've obtained grooves in the center of both the center and also the off-center tray to make sure that they could just be connected in together. all you have to do to set up these is placed changed thin-set on the Flooring both on a concrete slab and a plywood subfloor you could mount both with changed thinset. as soon as you have actually done that you press the tray down right into the thinset. You'll wish to raise it approximately ensure you have complete coverage on the tray likewise watch a few their video clips right here that's going to explain I'm simply going to just sketch it out here a bit of ways to broaden in various sizes that you can do with the trays. so below is the 32" x 60" off center tray once more it can be found in two items you obtain a big box like that one right there as well as it has two items in there exact same with the center tray except certainly it'll remain in the center instead of countered.
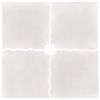
I just intended to do a fast video clip on our extension trays and simply reveal you as well as tell you a little bit about them and how you can utilize them as well as just what they're for. okay so, firstly, we have actually got an expansion kit below which has 4 items each are 12 inches wide as well as they're all going to be pre-sloped as you could see right here. many sizes of pans to use there is a thin side and a thick side so as you could see there's that slope. they're each sloped quarter of an inch so one side is a quarter inch much less compared to the thick side. fine so they're each going to be pre-sloped to quarter of an inch so when you're making use of these to expand among your pre-existing shower trays or our 32" x 60" both Facility alternative or 48" shower trays they're going to be pre-existing so you should make certain you know which is the reduced side so that you could incline it properly to the remainder of the shower so you don't actually set points in reverse. likewise, I wish to reveal you right here and you could see that I have actually already got some pre-cut below yet they have these 45-degree tilted pieces that you could eliminate on the leading and all-time low of the tray. now the just one that you're truly ever most likely to have to reduce at these 45-degree angles are when you're making a 72" x 72" shower tray. I have actually obtained a video clip on that particular as well as how you can, in fact, do that so see to it you examine that out. none of the expansions, as you could see, have notches like any one of our Trays which is exactly how those interlock with each other. don't worry about that, all you have to do is place modified thinset between the item when those two attach to every various other and when they attach to a regular 32" x 60" or 48" trays you simply put some modified thinset between it and also squeeze it with each other. that'll create a bonding there. so aside from that, they all set up with changed thinset mortar both on a concrete piece or a plywood substratum. You will just basically changed thinset on the floor press it down press it into thinset squeeze it around as well as your desire to lift it up to make certain that you've got full protection on the whole tray. now have a look at and also look out for some of our other videos on best techniques to utilize thinset and how you can properly embed these items and also just how they are made use of to expand a 32" x 60" to a 56" x 60". they are used to extend a 48" tray to a 48" x 72" or 72" x 72" as well as how that really functions is you'll obtain 2 extension trays and also you'll turn 48 inches right into 72 inches on all four sides. I've got video clips on those as well as how that functions. drains for your shower pan
Now I wish to review a 56" x 60" center or off-center shower tray. just sort of desire to reveal you genuine fast exactly what you get and also exactly what's inside 56" x 60". first, off we're gonna have our 32" x 60". This is our common dimension as well as I'll have a video clip and it remains in the web link in the summary if you click on that it will certainly describe the dimensions that we have in how we expand the trays. so exactly how we start off with the 56" x 60" is we have a 32" x 60", it's either going to be an off-center or it's gonna be a facility drainpipe positioning. pre made pans for your shower Then exactly what you're getting is four extension items. they're 12" x 36" inches each as well as one extension kit includes 4 of them. So we have actually laid out our 32" x 60" tray and afterward, we're just gonna get hold of these expansion pieces right here so you're gonna take and also include in the Sides of the 32" x 60". you're going to should look at its slope, there's a slim side as well as a thick side so make certain you position in the appropriate method to obtain the proper incline. There you have it. After establishing the expansions alongside the typical tray you have actually extended each side by 12" making it an overall of 24" contributed to the initial 32".